


Loose Legs, Floppy Wings, Bad Behavior
A strange paradox: these days, when chicken is cheap and you could roast a bird every day if you felt like it, people have completely forgotten something that, just a hundred years ago, practically everyone who roasted a whole chicken knew. I'm talking about presenting a whole roasted bird properly — making it look handsome on the table.
Take a look for yourself. Go to Google Images and type in “roast chicken” — or the same in any other language. Nine times out of ten, or maybe even more often, you’ll see some poor chicken with its knees vulgarly spread wide, legs flopping loose, wings dangling in the air, and the body cavity, at best, modestly stuffed with a few sprigs of parsley.
As a result, the legs end up scorched and dried out, the breast collapses, and the whole thing, you have to admit, looks pretty "slapdash" — as if someone just threw it in the oven and hoped for the best.
Another common sight: the bird tied with its legs crossed. It covers the cavity, sure, but it doesn’t do anything for the shape of the breast.
Even in my own early posts 20 years ago, you'll sometimes spot chickens that look exactly like that — I’ll admit it: guilty as charged.
Why Every Bird Needs a Good Binding
There are plenty of reasons to truss a bird before roasting:
• It makes the bird look plumper and lifts the breasts up — like a good push-up bra. And we all know how important that is.
• It shapes the bird into a compact, tidy form. No loose parts sticking out. You can brown it in a skillet before roasting, if you like — or fit four chickens side by side on a baking tray without them overlapping. You can even put it on a spit before the fire, and it will roast uniformly.
• By pulling the legs in and rounding the body, the chicken roasts more evenly and holds its moisture much better.
Back when a roasted chicken was a celebration, not an everyday dinner, people clearly paid more attention to how it looked. In those days, they even had special long needles made just for trussing birds, so that a roasted chicken would hold a proper, beautiful shape — and you could barely see any trace of the string holding it all together.
These needles are nothing fancy: just a long (about 25 cm, or 10 inches) narrow metal tube, sharp on one end and with an eye on the other for threading the string. Simple. And they weren’t some silly “unitasker,” either. A trussing needle was a common tool in the kitchen, used for anything that required piercing or pricking.
For example, in 19th-century cookbooks, when giving instructions for baking pastry shells "blind," they would always say, “prick the bottom of the shell all over with the trussing needle.”
Not a fork — a trussing needle.
You can still find one today, but you’ll probably have to order it online. Look for "trussing needle" or "aiguille à brider" if you want the French term. Just don’t confuse it with a larding needle — that’s a much bigger and entirely different tool. (More on those, perhaps, another time.)
But you don’t actually need a special needle. You can shape a bird just as well with a simple piece of linen string — if you know what you’re doing and understand why it matters.
(Only photos here, but paid subscribers get access to four detailed videos showing the same techniques in action — plus a few extras. See the end of this post.)
What’s Wrong With Most Trussing Today
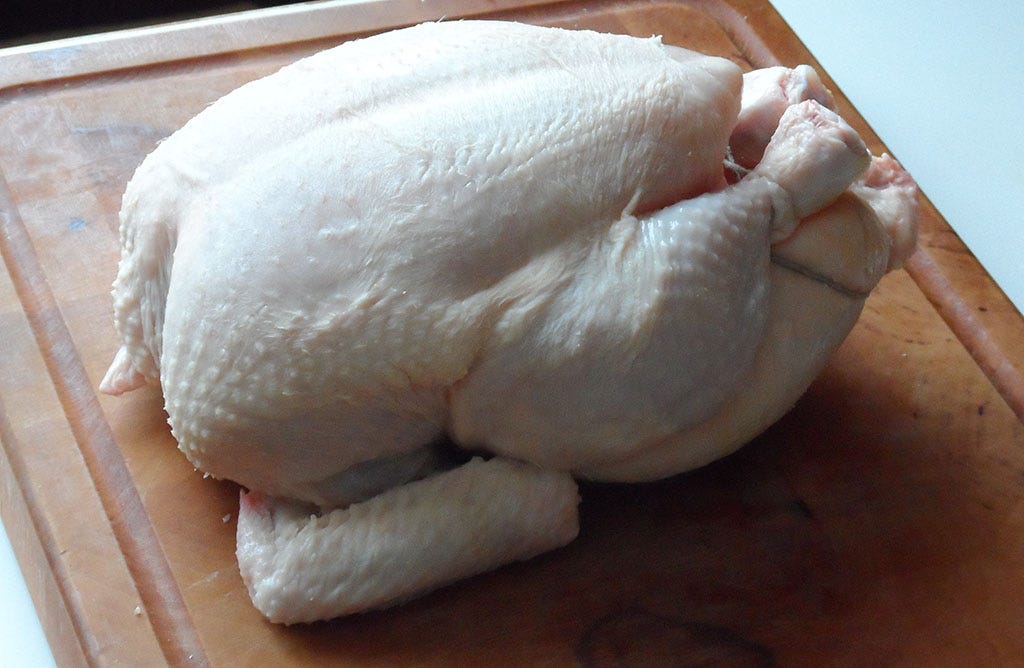
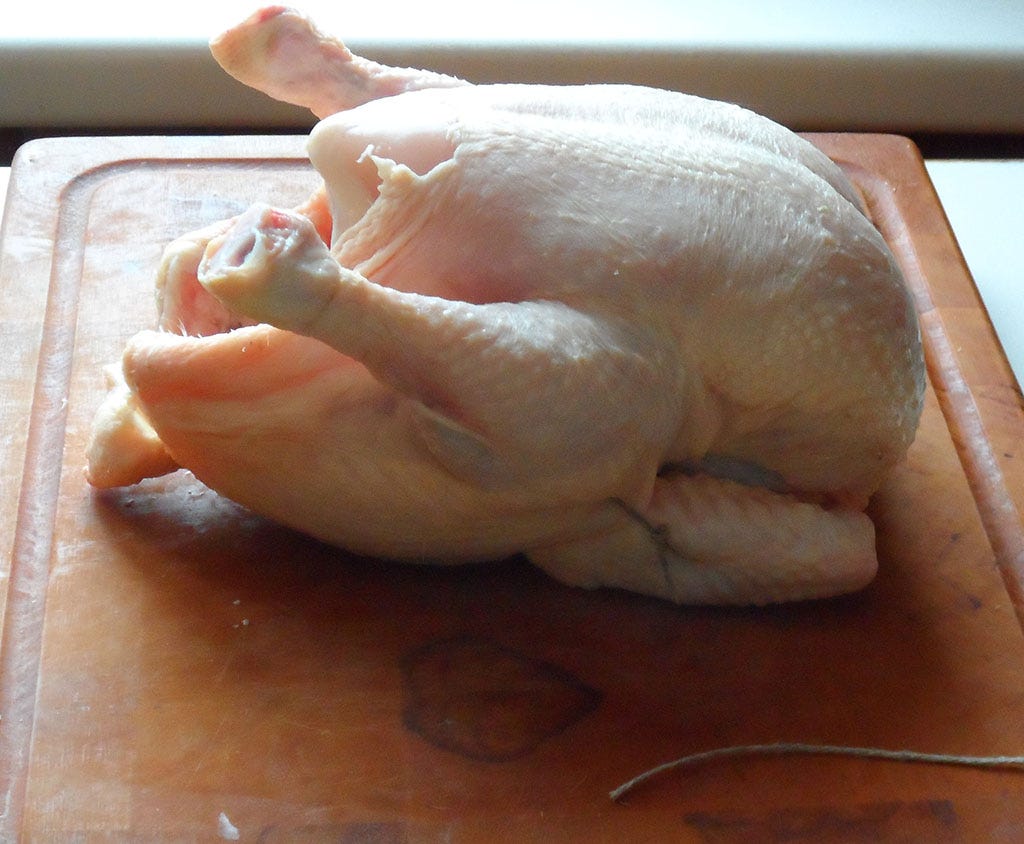
Sometimes you’ll buy a chicken at the store that's already been trussed. It looks something like this:
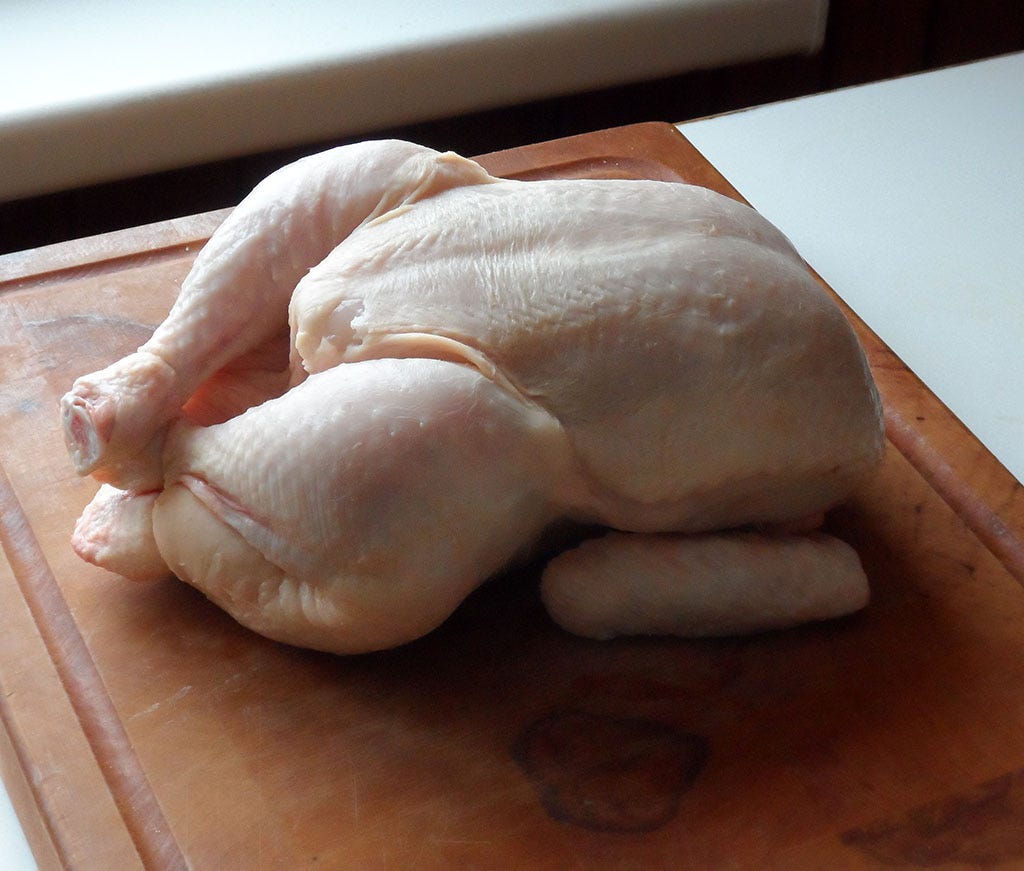
What’s wrong with this kind of trussing? Let’s take a look: the legs are crossed, the cavity is left wide open, and the breast is sunken. The knees are pointing almost straight up, and if you look from the side, the legs stick up higher than the breast — when it should be exactly the other way around.
At this point, the chicken doesn’t look like something you want to eat. It looks more like a relaxed young lady who’s lost her sense of decency. Definitely pas comme il faut.
The wings, to be fair, are folded back correctly. And of course, the bird was gutted without much care — likely by some automated device — because the skin under the breast, around the legs, is torn. But don’t get me started on the sloppiness of commercial chicken butchery, let’s move on.
The bird is tied up with some kind of rubber band, which feels ridiculous. You’re supposed to truss with firm string, not something stretchy. Keeping things tight and correctly positioned, that’s the whole point.
So, let’s quickly untie the poor thing, loosen up all its joints, and bend it around a bit in every direction. Let it relax. Once the bird has relaxed, we can start from scratch and truss it properly.
Proper Trussing, Step by Step
Meanwhile, go find yourself some sturdy linen string — “special culinary” twine is not critical, any good old sturdy string will do. Just make sure it is not plastic, or it'll melt all over your bird.

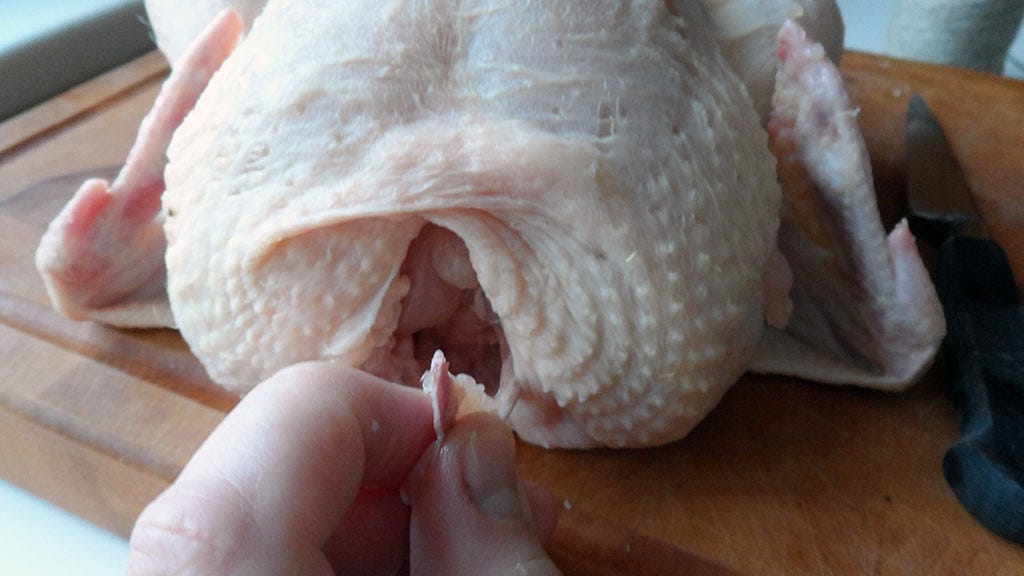
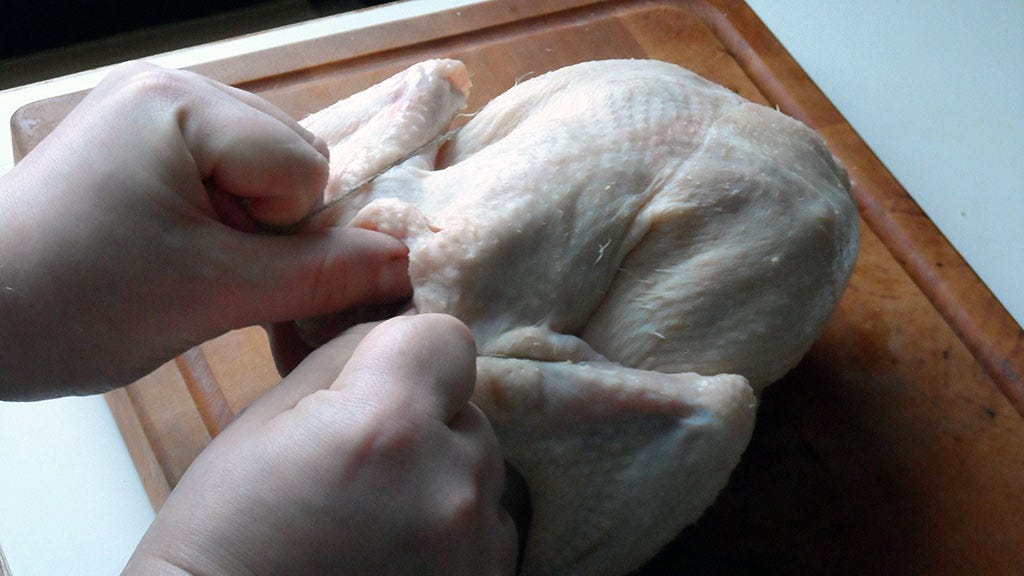
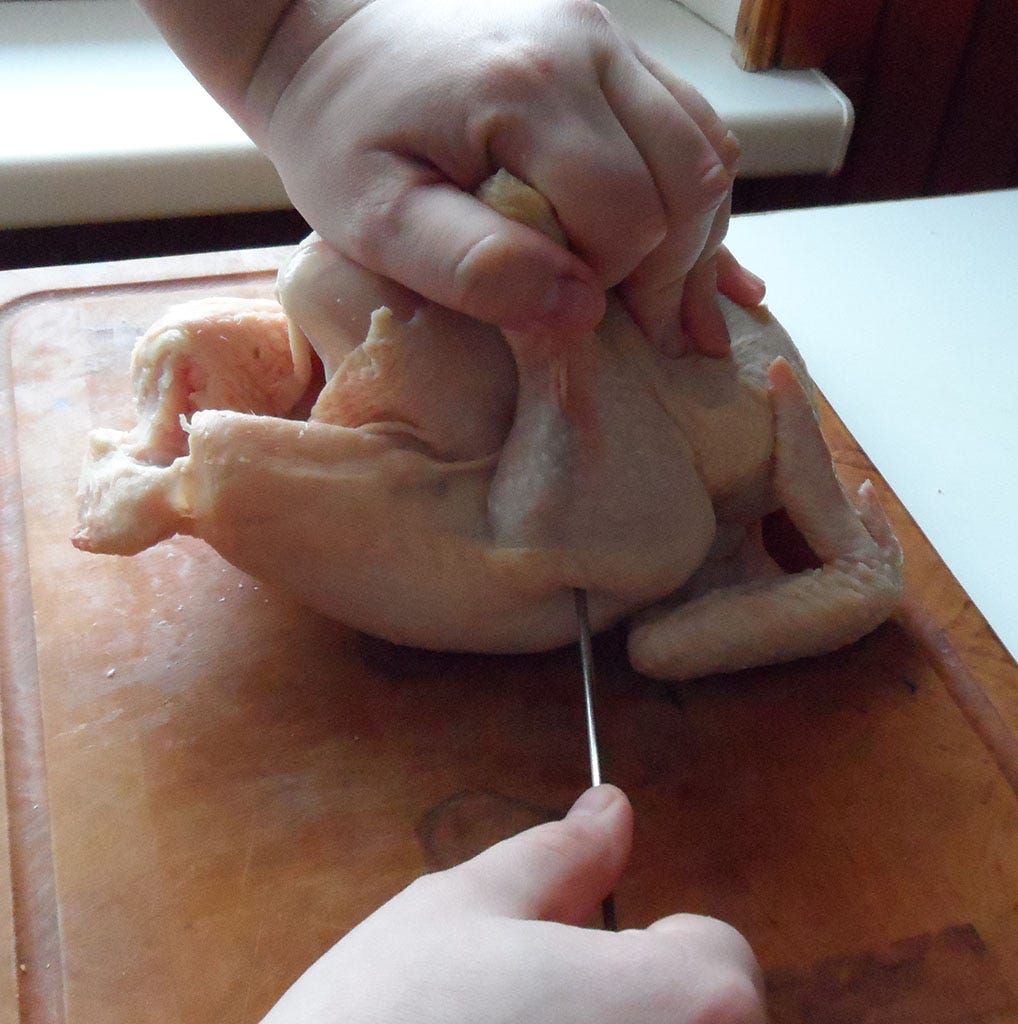
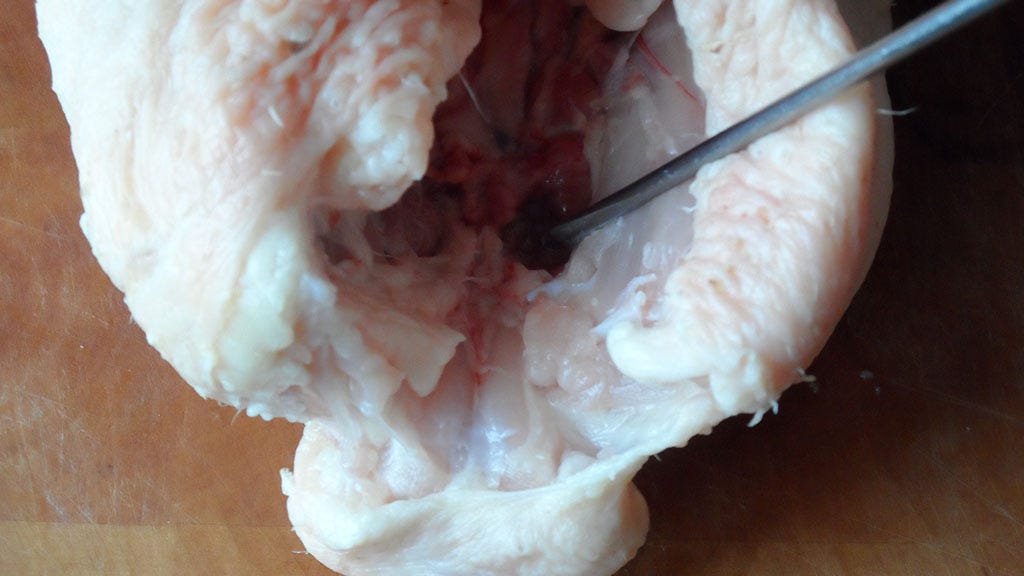
First, right where the chicken’s neck used to be, feel around with your fingers by pressing against the ends of the breasts, make a small cut in each, and remove the little bone you’ll find there. If you take care of this now, it’ll be much easier to carve the bird at the table later, once it’s roasted. That little piece is called the wishbone. All birds have one. Humans do too — it’s just split into two bones, and we call them clavicles.
Cut yourself about a meter of string, and let’s get to trussing. Follow my lead.
First, holding both ends of the string, slip it underneath the chicken, just a little higher than where the tail begins. Bring the ends up over the top.
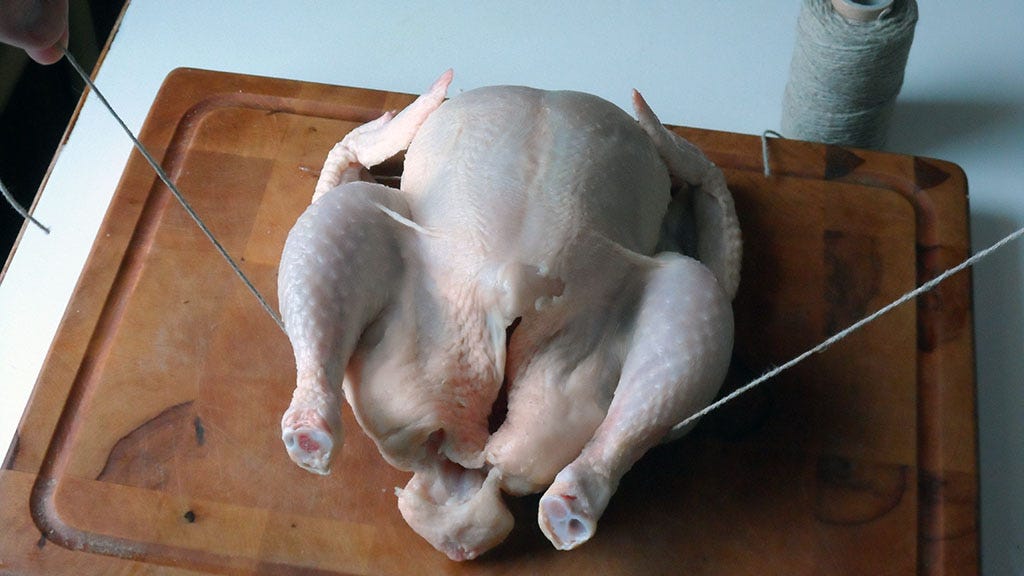
Cross the ends over each other, swapping hands.
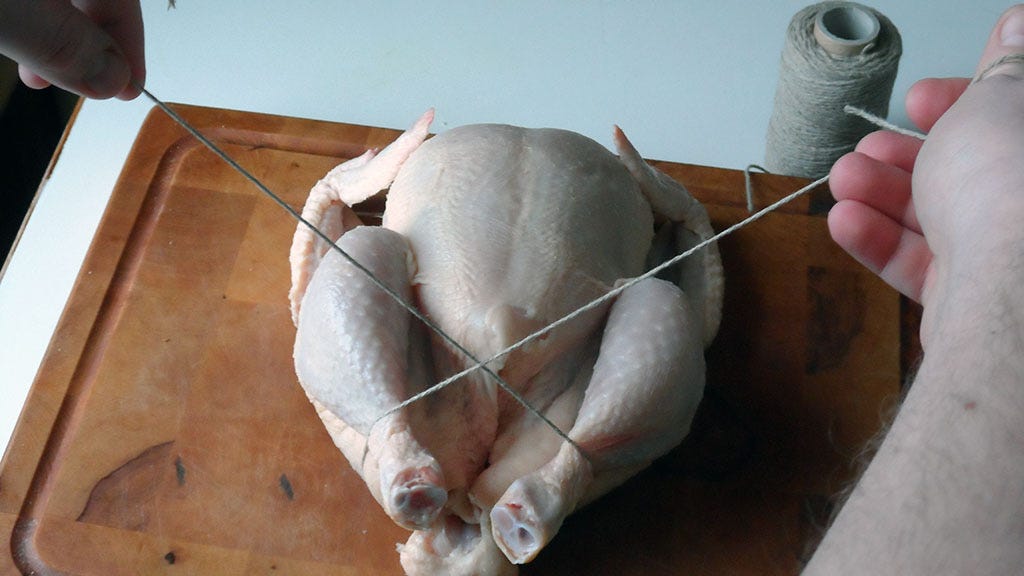
Then lower your hands down, pulling the string so that each end passes between the bird’s drumsticks. Be careful not to let the string slip off the legs. It should look something like this:
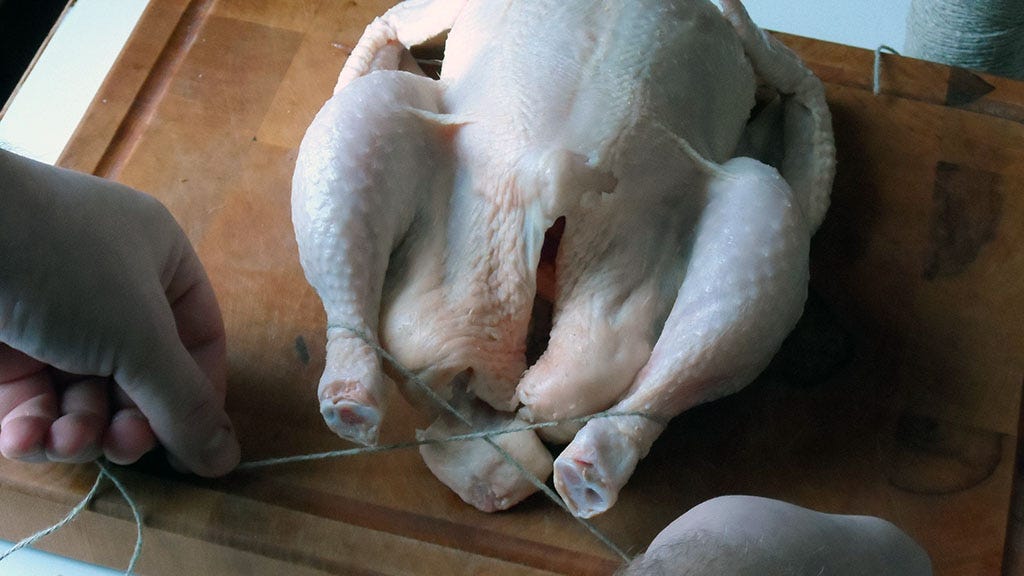
Now bring the strings forward and give a gentle tug — just enough to pull the legs close together (but not crossed! If you cross the legs, you won’t be able to lift them properly upward; they’ll jam against the bottom of the breast.) The illustration below shows the moment when the string is being tightened. Later, the string should run not over the drumsticks, as shown here, but a little lower — between the drumstick and the thigh.
Turn the chicken so the neck end is facing you, and check from the sides to make sure the strings are running correctly. Gripping the ends of the string firmly, brace your thumbs against the tip of the bird’s neck and pull the string tight.
This is a very important step — and it’s the one that most internet teachers, whether in photos or on YouTube, completely skip over.
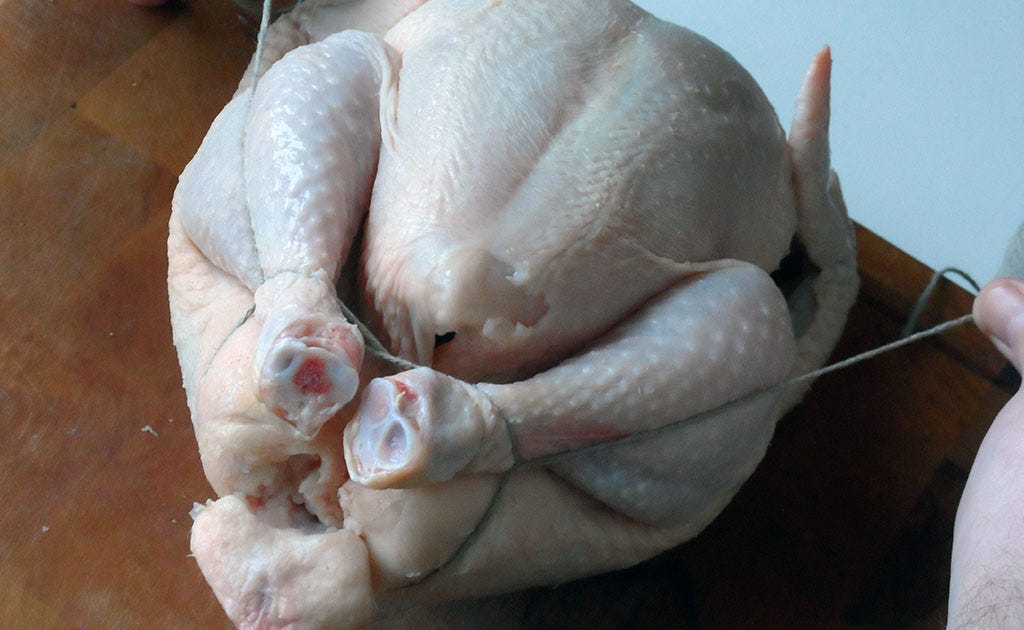
As you tighten, draw the bird’s knees up as high as possible toward the neck. Then tie off the string, hooking it around the leftover bit of neck and gathering the neck skin under the string, so the breast skin stretches nicely across the front.
This is what a properly trussed chicken should look like: the knees pulled up to the breast right by the wings, and the string pressing the legs in snugly against the body. When it’s done right, the breast puffs out, looking much fuller and more elegant. Fold the tips of the wings back behind the body.
This kind of trussing still won’t be absolutely perfect, but it’s much better — and much prettier — than the factory-style rubber band job. The only small flaw is that the cavity remains a bit open, but that’s no big deal unless you’re roasting a bird that’s heavily stuffed.
Old School, Hard Core
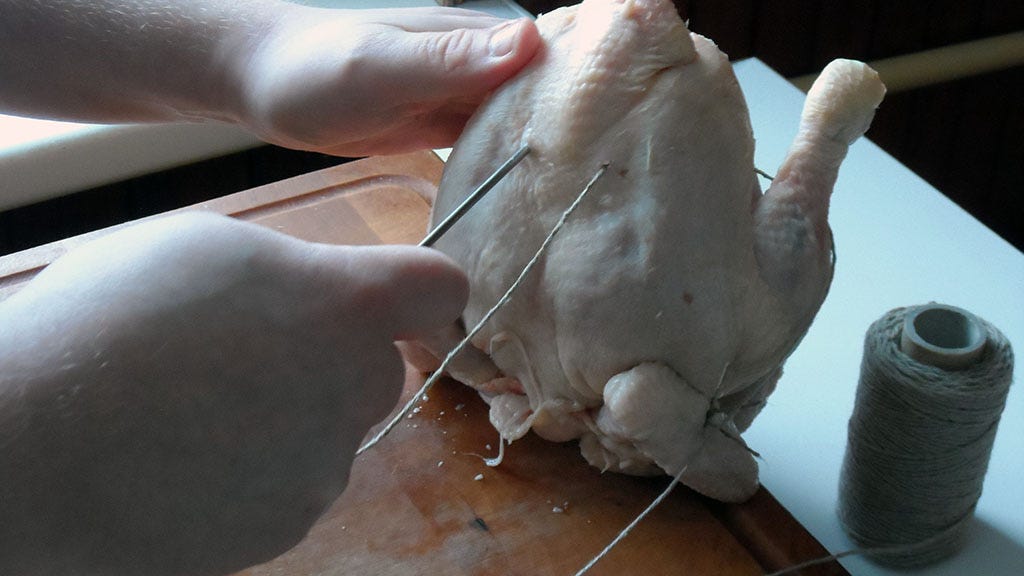
If you want to go a step further—the old-school, professional way—let’s take a look at how people used to truss a bird a hundred years ago, using a special trussing needle I mentioned earlier.
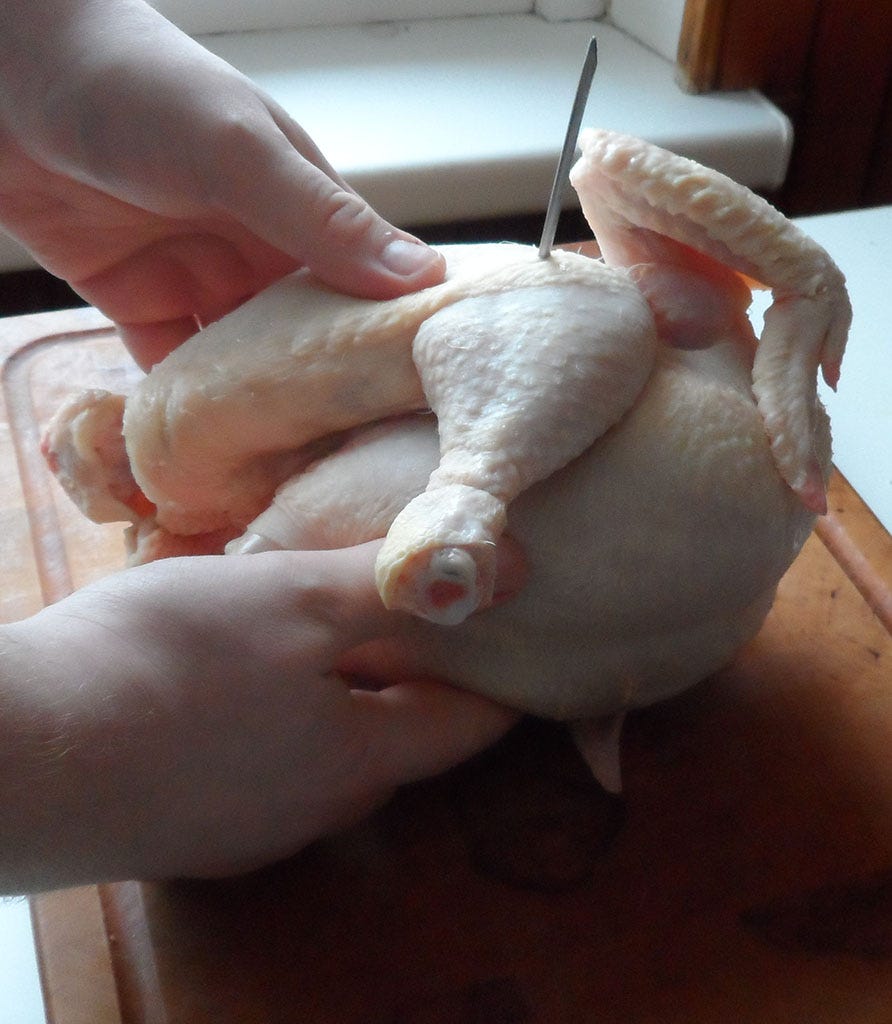
Lift the legs up as high as you can, and stab the needle through right at the knee joint. In this photo, the bone runs a little to the right and below the point where the needle goes in.
Push the needle straight through the bird, passing under the breast, and out through the other leg at a matching spot.
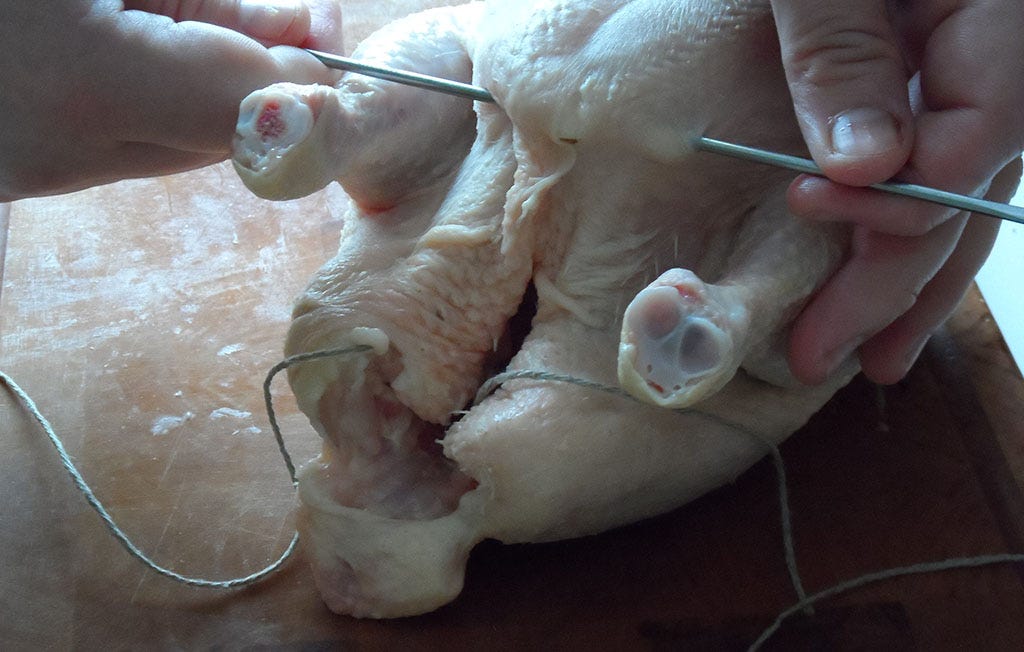
Then turn the bird over. Tuck the wingtips back behind the body, and pull the neck skin up and over the top to stretch the breast skin nice and tight.
Now stab the needle through one wing, pin the neck skin against the back, and finish by pushing the needle through the other wing.
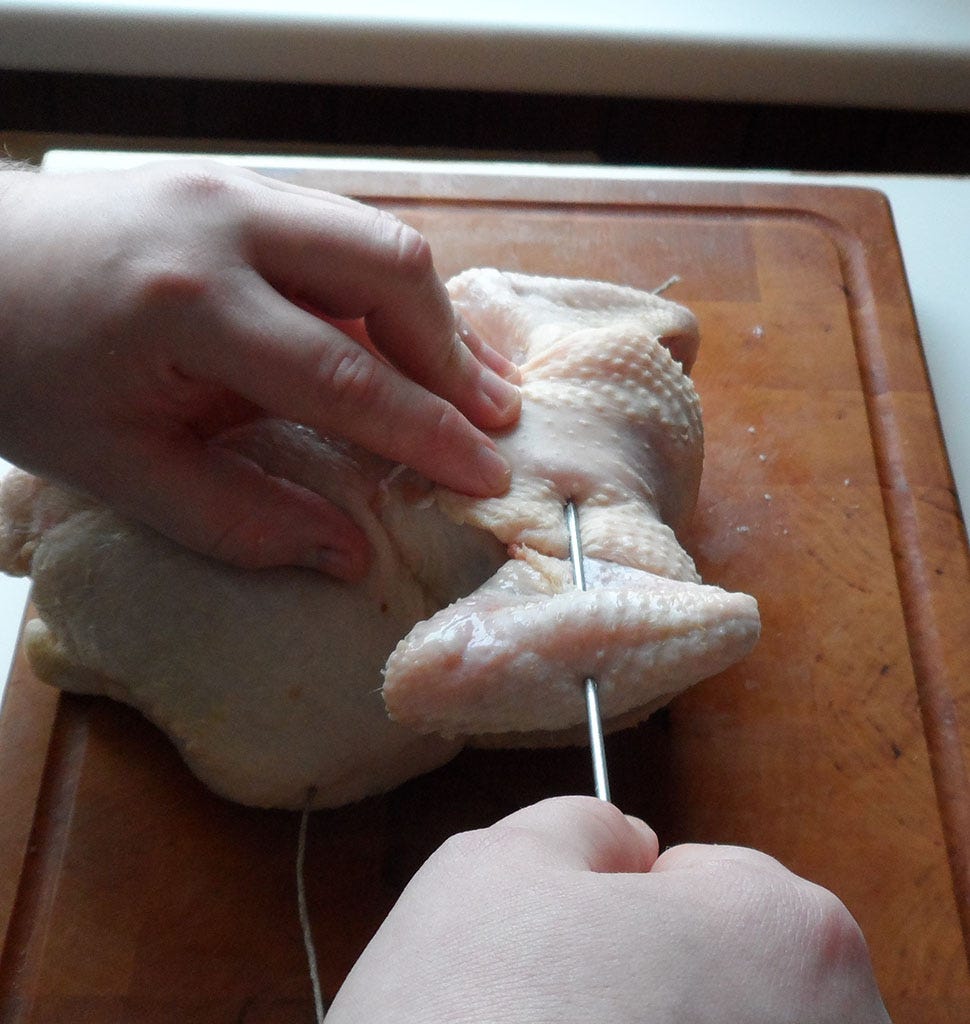
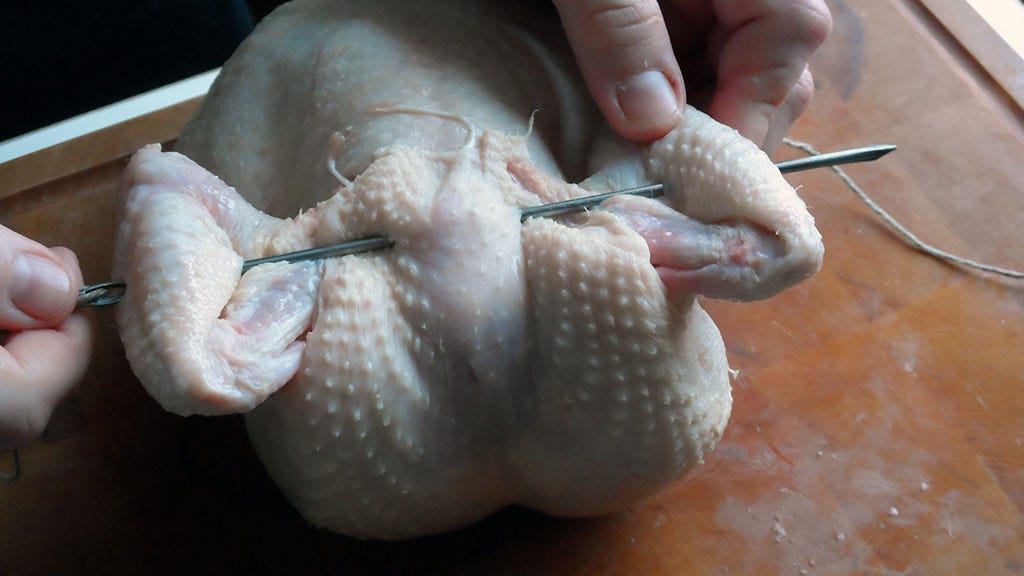
The end of the string now comes out very close to where we first started stitching. Tie a knot — start with a triple knot to pull the string tight. (A triple knot isn’t three knots stacked on top of each other; it’s just a regular knot, except you loop the string around three times instead of once.) Pulled tight, it holds firmly enough to let you tie one more time to lock it in place.
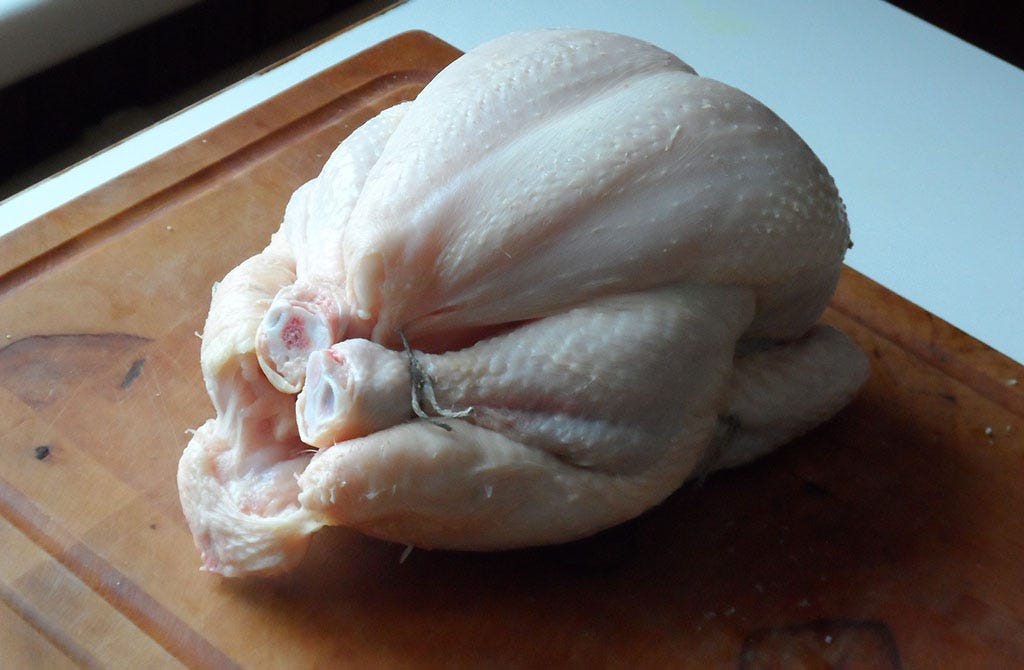
At this point, the bird’s knees should be drawn in nicely against the body.
The top half is now well trussed and secure — but the legs are still spread indecently wide. No worries, we’re not done yet; we’ll fix that next.
Look down into the chicken’s cavity, and you’ll see two hollows. That’s where the pelvic bone runs through, and it’s thin enough to pierce easily with the needle.
Thread the needle with a second piece of string, and push it through so that it comes out the bird’s back...
...then bring it back inside again, this time on the other side of the spine.
This way, you anchor the string on the thickest bones in that part of the bird.
Gather the loose skin at the bottom of the breast, pull it tight, and stab the needle through the skin underneath the breast. If you want an even stronger hold, you can push the needle straight through the bottom of the breast itself, right through the tip of the cartilage at the end of the breastbone. Here, I’m only piercing through the skin under the breast.
Catch the legs inside the loop of string and, pulling everything tight, draw the ends of the legs together.
In the old days, they didn’t cut the legs short the way they do now. They left them longer — sometimes even keeping the feet attached (with the two side toes chopped off, leaving just the middle one, and of course, after blanching the feet in boiling water and peeling off the outer skin).
In this case, one leg looks a little longer than the other in the photo, but that’s not a fault of the trussing — it’s just uneven butchering at the factory. Ignoring that, the bird is trussed perfectly.
Ready for the Fire
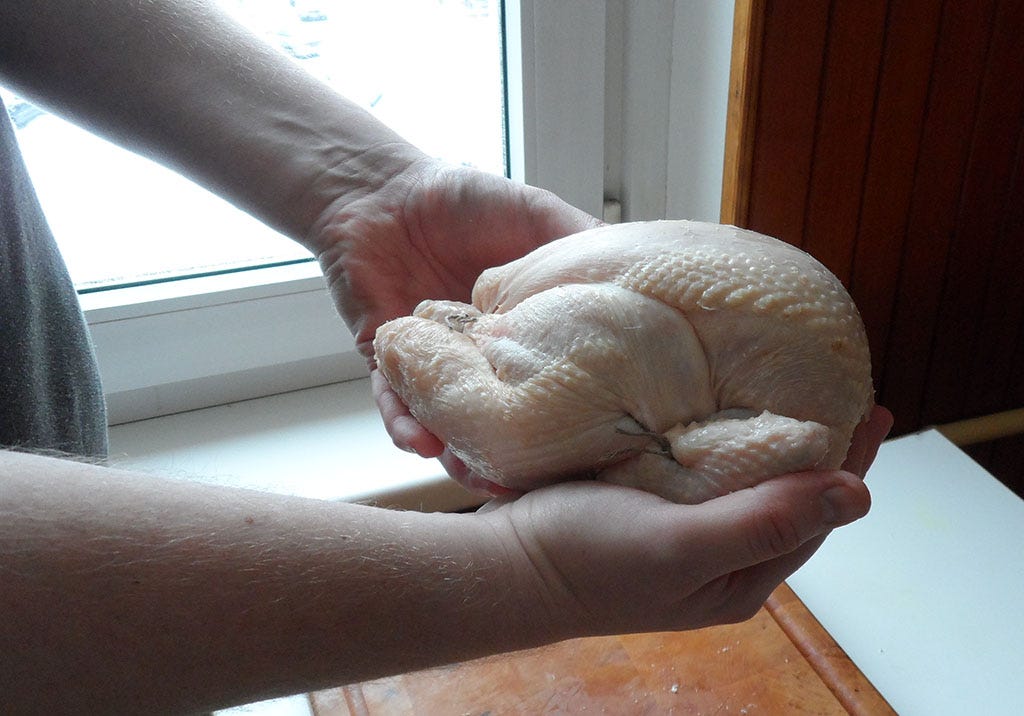
A bird trussed like this can now be roasted, poached, skewered and roasted in front of a fire — or cooked however else you like.
Once it’s done, it will be juicy, fragrant, and even after you pull the strings out, it will hold its shape beautifully.
And if you want to brown the bird all over in butter before roasting, trussing it this way makes it much easier — no awkward loose parts flapping around and getting in the way.
Once properly trussed, rub the bird with a clove of garlic crushed together with a dozen black peppercorns, a few allspice berries, three cloves, a pinch of anise, and two generous pinches of salt. Stuff a chopped celery stalk inside for fragrance if you like; it pairs nicely with the scent of anise.
Roast in a moderate oven for about 1 hour and 20 minutes. Let it rest before pulling the strings out. They slide out easily from a properly trussed bird.
Now you can decorate it however you like: surround it with vegetables, roast potatoes, or just garnish with a few sprigs of parsley, and it will look perfectly at home even on the most elegant table.
A little sneak preview
Once you know how to truss a simple chicken properly, a whole world of possibilities opens up — not just for historical recipe recreations, but for everyday dishes as well — since most birds, unless you're trussing an ostrich, are built the same way and trussed the same way, too.
There are some nuances, of course. Keep the needle a little higher when piercing through a goose or a duck — their spines are a bit thicker. Always remove the pouch of internal organs from inside the neck skin before trussing a turkey. For small birds like quail, use a simpler method with just one string. For ducks, pierce the wing closer to the joint, not through the middle, so tightening the string doesn't lift the knee joint. That sort of thing.
But overall, the technique stays the same. And once you understand what each movement is for, the little adjustments come naturally.
Notice how different the birds look, when they are trussed correctly. Here’s a glimpse of what’s coming in future posts — all prepared by me, using the same basic technique:
Don’t miss what’s coming. Subscribe if you haven't already.
It all starts with doing things right from the beginning: shaping the bird, securing it properly, and roasting it with care.
Because once you learn how to shape a bird like this, you're not just roasting chicken anymore. You're cooking with intent — and that changes everything.
Truss it like you mean it. Master that, and there’s no limit to what you can bring to the table.
And now, behind the velvet rope: the paid-only section.
Moving Pictures, Finally!
As some of you know, I promised my paying subscribers that I’d show not just photos, but also videos where you can see the techniques I talk about in better detail. I’m a complete rookie when it comes to video — filming, editing, cutting, adding sound — it’s all a bit unfamiliar and confusing. But I hope I’ll get the hang of it over time.
So, here’s what we’ve got:
Video One. A chicken, trussed using the simple method — no needle. This is the most basic and commonly used technique, and yet it’s kind of astonishing how often this step is skipped in cooking videos, brushed aside as “too complicated, your viewers aren’t professional chefs, they won’t know how and won’t care.” I can’t stand it when someone decides on behalf of the viewer what they should or shouldn’t be interested in.
Video Two. Here’s the same chicken, but now it’s being trussed the old-school way — with a needle. The full process, start to finish. It’s a bit awkward with the camera in the way, and I have to constantly remember not to block the view with my hands. But I hope that after watching this ten or fifteen times, you’ll be able to repeat it easily. There’s really nothing complicated about it.
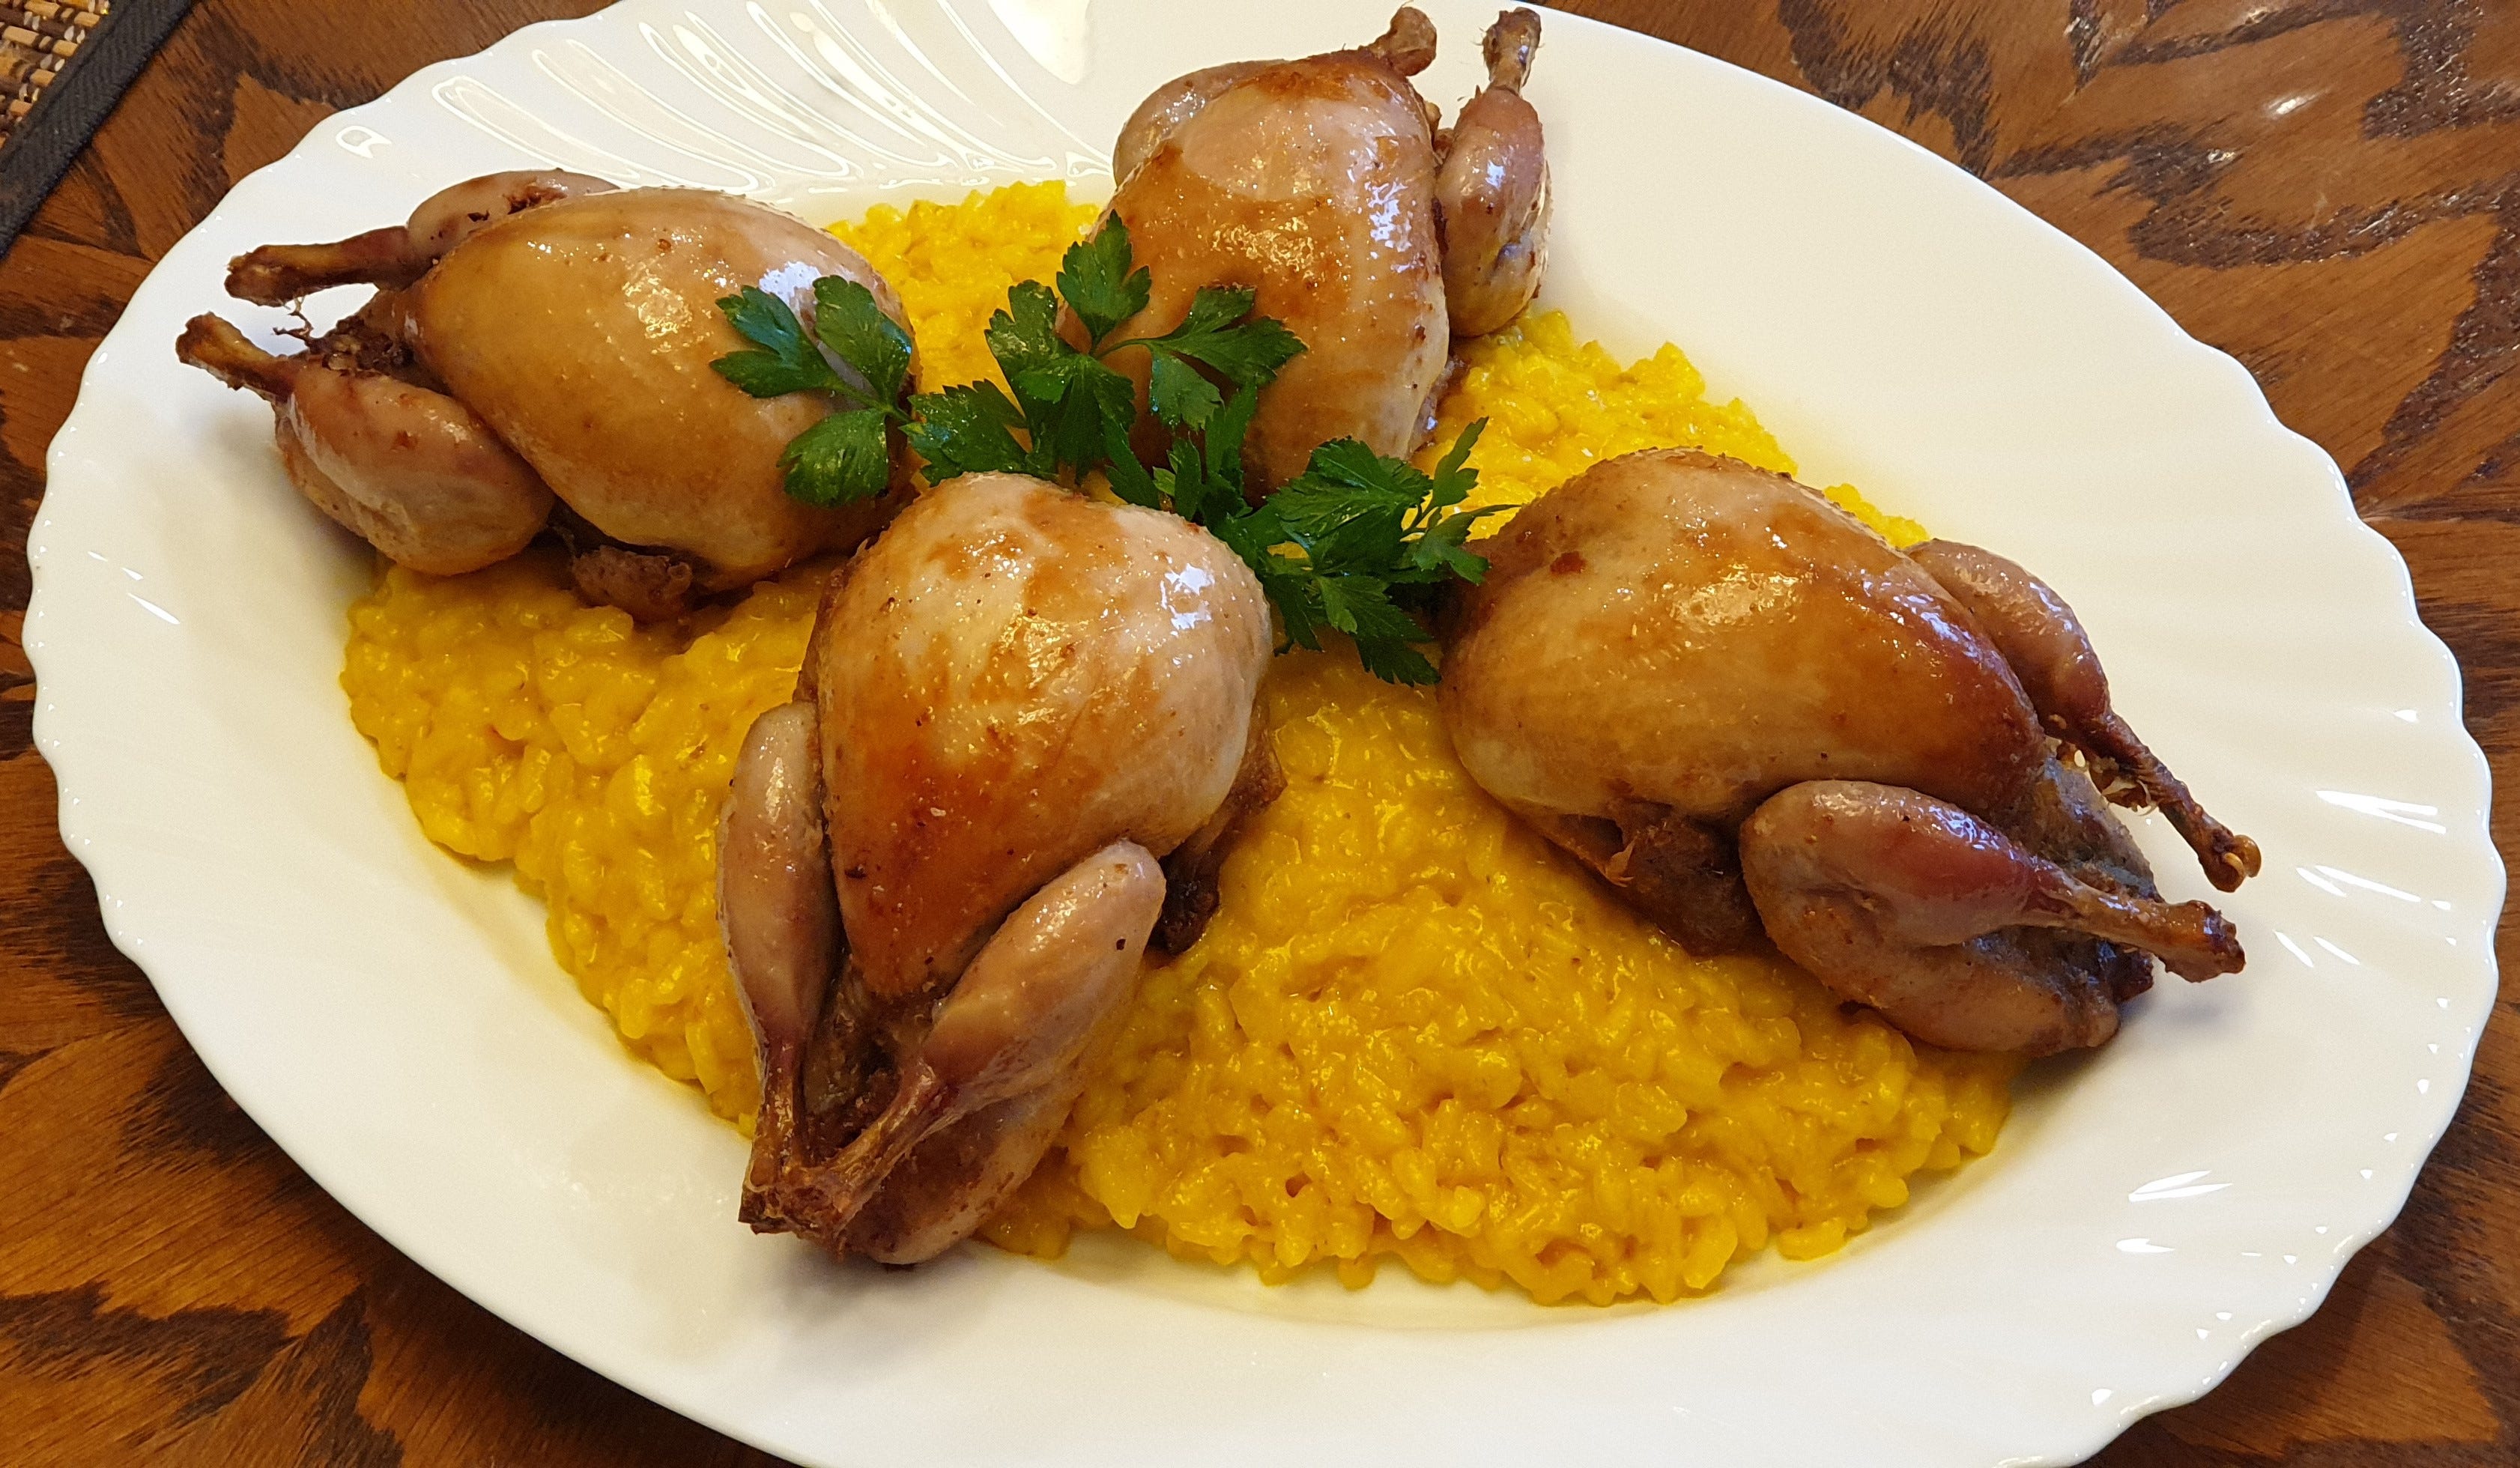
Video Three. Let’s raise the difficulty a notch. When trussing tiny birds — like quail, partridge, or these spring chickens that weigh about half a kilo — using two pieces of string can sometimes be overkill. You can get away with just one, and it’s a bit quicker. I haven’t described this method in writing — it’s only visible in the video. Though if you use the same two string trussing method from the photos, it’ll work perfectly here too — maybe even look a little better.
Video Four. A full-on stress test. What do you do if you suddenly find yourself with a bird you’ve never worked with before, but you still have to truss it? In this case, it’s a pheasant — a small one, about 900 grams. I bought it frozen from a local wholesale shop; it’s wild, hunted, imported from England. Sounds good on paper, but once thawed and unwrapped from the plastic, it turns out it’s missing half its ass (likely where it took the fatal shot), the wings are just broken stubs, and there’s barely any skin left on the breast. I’m not a hunter, and up to now, I’ve only ever made pâté from birds like this. But as you’ll see, it’s still possible to adapt the traditional trussing method creatively. (It took me a little longer to pull out the wishbone, even broke it in process. The structure is similar to a chicken’s, but the tendons are much tougher.)
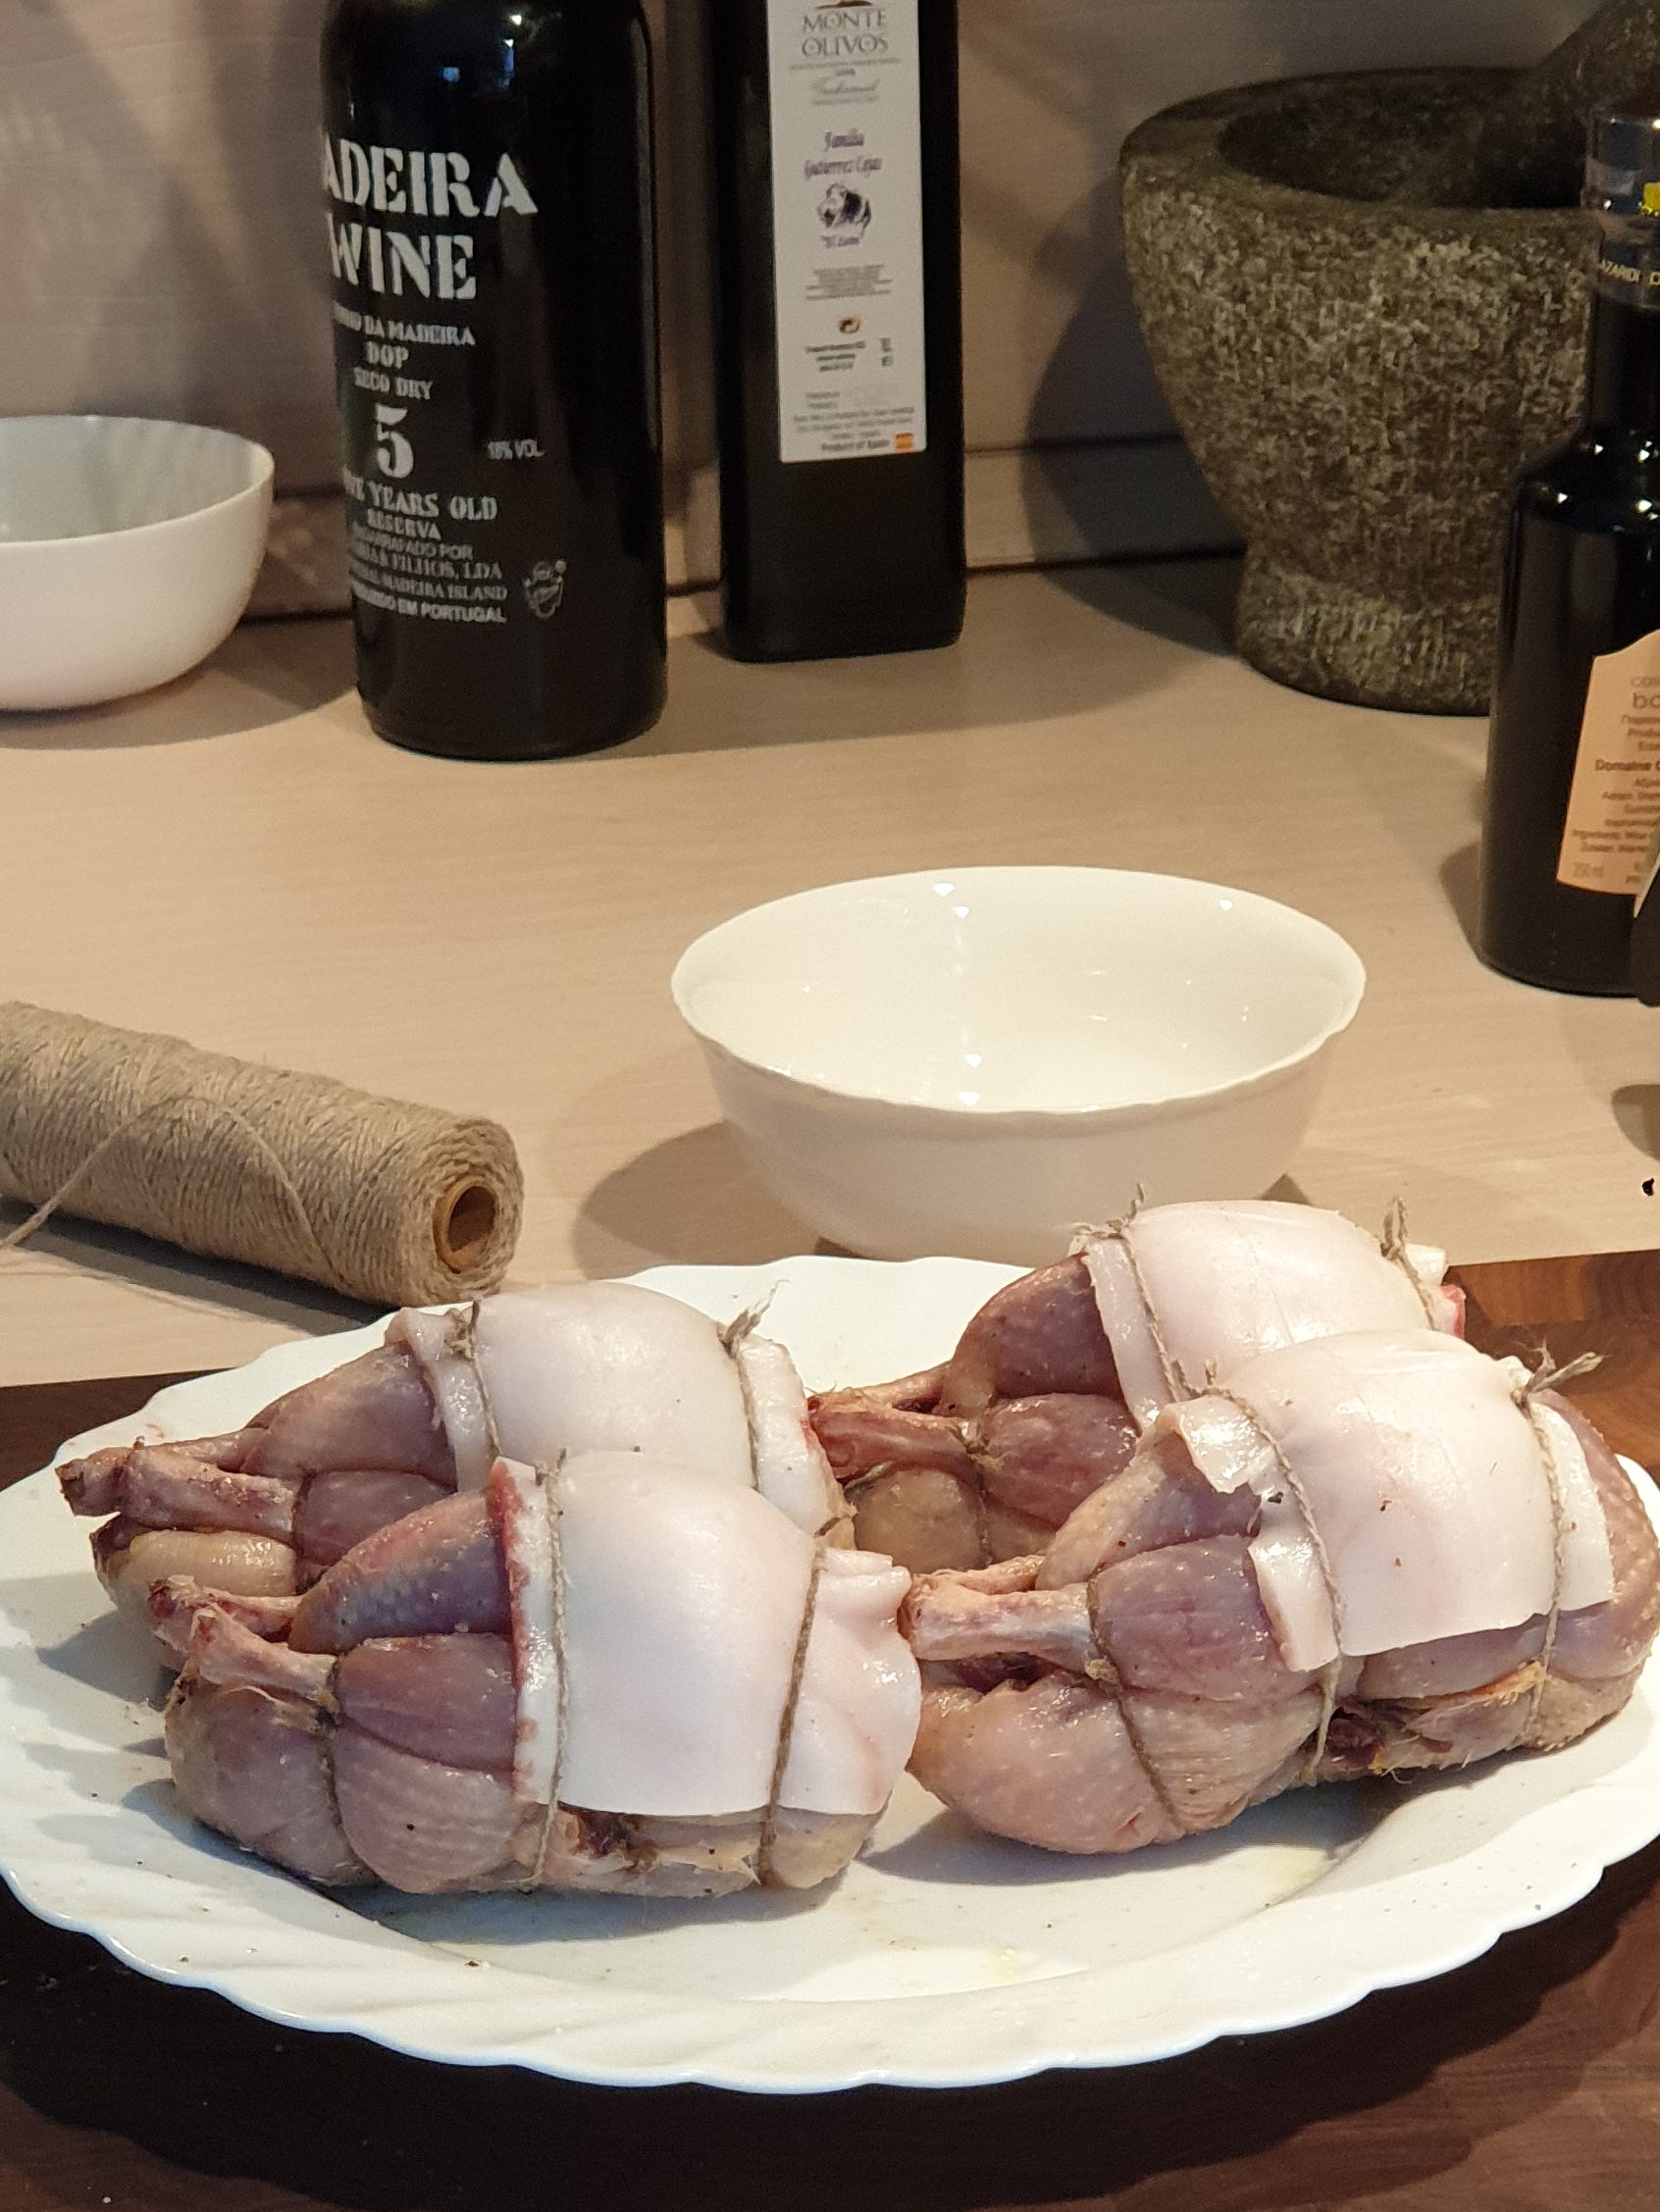
In the very near future, these birds will become the following dishes:
The pheasant will most likely be cooked sous-vide, to keep it from drying out completely due to the lack of breast skin — together with truffle butter and Madeira — and only browned at the very end. The sauce will probably be based on stock and truffles.
The small chickens will be stuffed with a bit of fresh tarragon, roasted, and served with a cream and morel mushroom sauce.
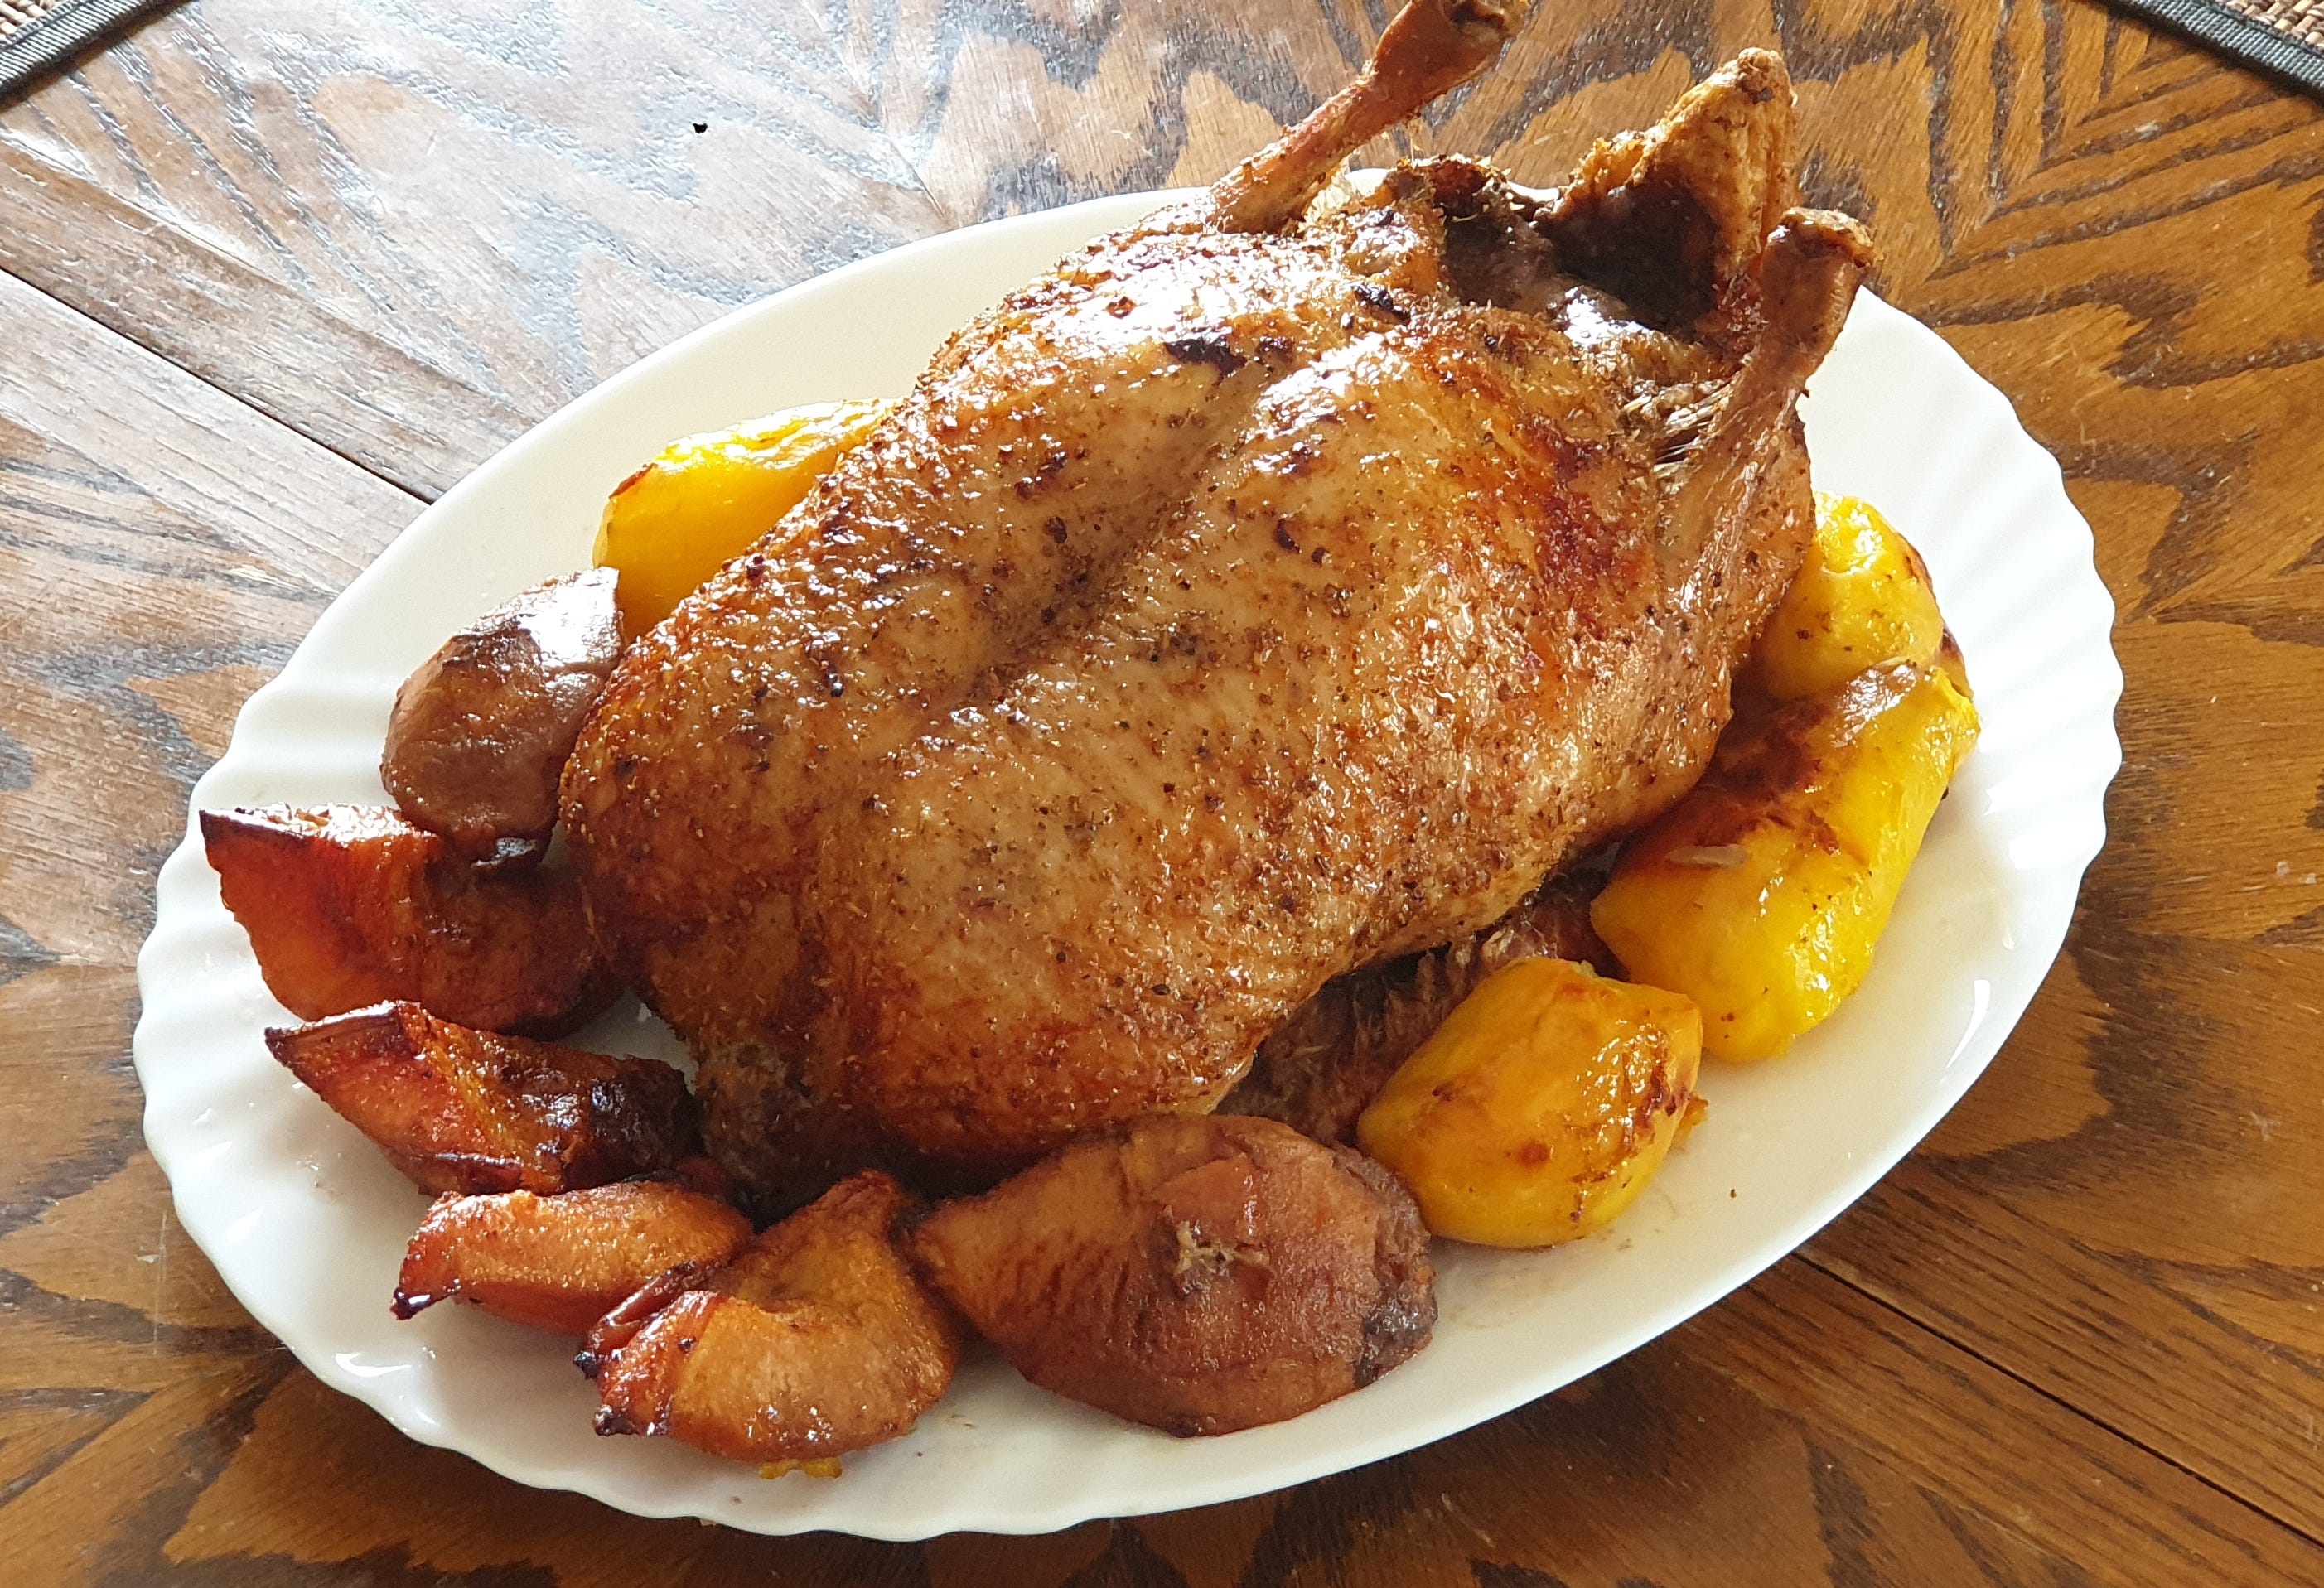
The simple broiler chicken will be rubbed with cloves, cinnamon, cardamom, and roasted together with pieces of quince, and likely glazed with some honey as well.
Keep reading with a 7-day free trial
Subscribe to Old Anarchist to keep reading this post and get 7 days of free access to the full post archives.